Yoga, a practice renowned for its physical and mental benefits, can sometimes feel inaccessible due to limitations in flexibility or strength. But what if we told you that simple props, like yoga blocks, could unlock a deeper, more accessible practice? These unassuming rectangular blocks offer invaluable support, allowing you to refine your alignment, deepen your stretches, and experience the full potential of various poses. They're not just for beginners; even experienced yogis can utilize blocks to refine technique and prevent injury. Think of them as your personal yoga assistants, guiding you towards greater comfort and improved results.
This article explores five transformative yoga poses that are significantly enhanced by the strategic placement of blocks. We'll guide you through each pose step-by-step, illustrating how blocks can help you achieve proper alignment and discover new levels of depth and stability. Prepare to unlock a more fulfilling and accessible yoga journey, one block at a time.
Safety Guidelines
- Listen to your body. Don't force yourself into any pose that causes pain. Modify or skip a pose if needed.
- Use blocks strategically. Their height should support your body's alignment, not compensate for poor form. Experiment with different block placements to find what feels best for you.
- If you have any injuries or medical conditions, consult your doctor or a qualified yoga instructor before starting a new yoga practice or using props like blocks.
Methods: Chaturanga with Yoga Block Support
Tools Needed
Step-by-Step Instructions
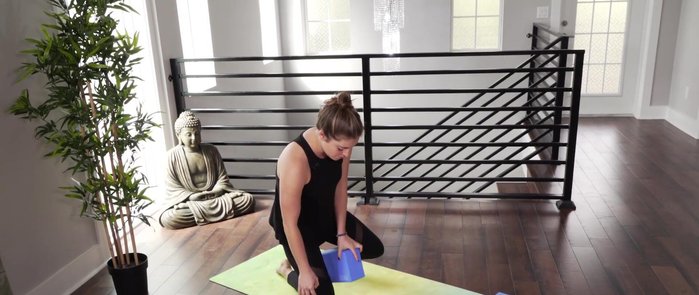
Preparation
- Place a block between your thighs and hug it to engage your core and uplift you.

Preparation Positioning the Block
- Place the block under your chest for support during the lowering phase of Chaturanga.
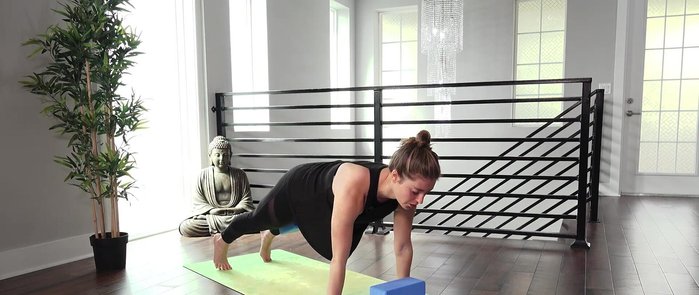
Positioning the Block Chaturanga with Block Support
- Come into plank, hug everything in, rock forward, lower down, using the block to prevent your shoulders from lowering too much.
Chaturanga with Block Support

Tips
- The block protects your shoulders from injury by preventing you from lowering too far.
- This helps train your body to maintain proper form and avoid going too low.
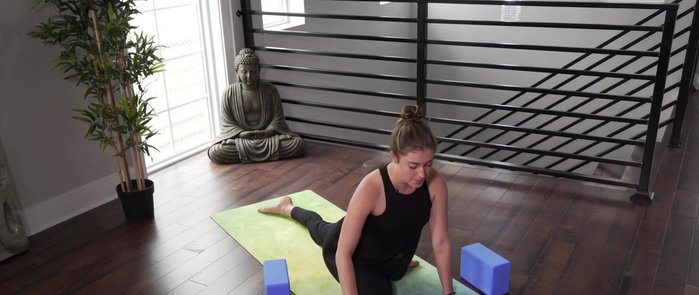
Methods: Seated Forward Fold with Yoga Block
Tools Needed
Step-by-Step Instructions
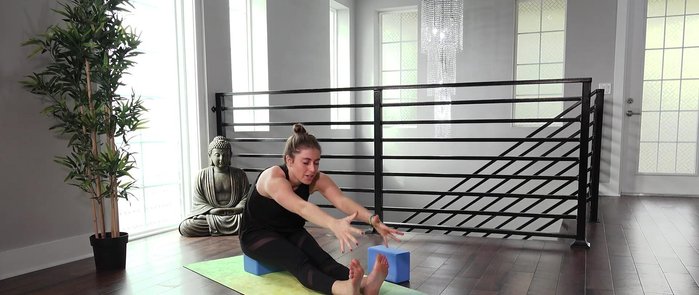
Setting Up the Pose
- Sit on the block to tilt your pelvis forward, creating space in your hips for a deeper forward fold.
Initial Forward Fold
- Reach up, fold forward, hinging from the lower back, and relax.
Initial Forward Fold Deepening the Forward Fold
- Place the block behind your feet for a more intense stretch. Hinge forward, bending your knees if needed, and relax.
Methods: Bridge Pose with Yoga Block Support
Tools Needed
Step-by-Step Instructions
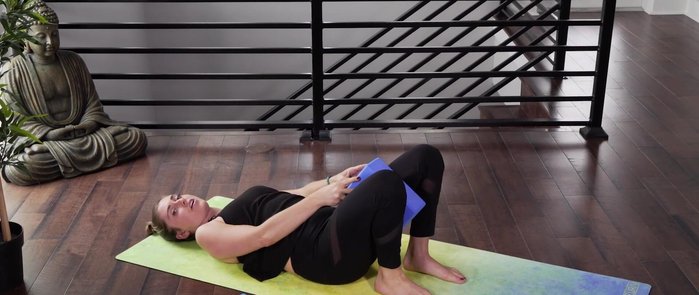
Set Up with Block Under Sacrum
- Place the block under your lower back for a supported bridge. Adjust the height (low, medium, or high) as needed.
- Come into bridge pose, placing feet close to your lower back, and place the block under your tailbone.
Set Up with Block Under Sacrum Refine Bridge Pose Alignment
- Roll your shoulders under and breathe. This creates an uplifting sensation in your back.
Refine Bridge Pose Alignment Alternative Setup: Block Between Thighs
- Alternatively, place the block between your thighs to engage your core and legs, grounding you and lifting you up.
Alternative Setup: Block Between Thighs


Methods: Pigeon Pose with Yoga Block Adjustments
Tools Needed
Step-by-Step Instructions
Setting up Pigeon Pose with Block Support
- Place a block under your hip to support it and improve balance if your hips rock side to side.
Setting up Pigeon Pose with Block Support Adding Support for a Sleeping Pigeon Variation
- For a sleeping pigeon variation, use another block to support your head for added comfort.
Adding Support for a Sleeping Pigeon Variation

Methods: Triangle Pose with Yoga Block Lift
Tools Needed
Step-by-Step Instructions
Set Up the Pose
- Place the block on the outer edge of your front foot to lift and open your torso.
Lift and Extend the Torso
- In triangle pose, use the block to lift and extend your torso, creating more space and opening.
Adjust Block Height for Optimal Stretch
- Adjust the block height (low, medium, or high) to find the best level for your stretch.
Adjust Block Height for Optimal Stretch

Read more: Build Strength in Yoga Poses with Cork Blocks: 3 Effective Exercises